|
The Dynamics GP Receivables Management module is also commonly referred to as Accounts Receivable, AR, or just Receivables. It is part of the Sales series, so menu options and navigation for the Receivables module will start with Sales. All the SQL server tables for the Receivables Management module begin with RM, so you may also see it referred to as RM.
Setup for the Receivables module includes the following:
1. Receivables Management Setup
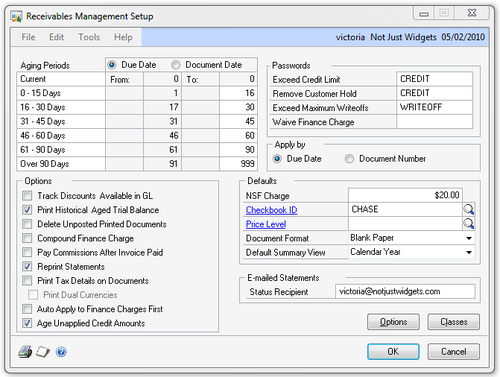
To start Receivables setup, open the Receivables Management Setup window by navigating to Microsoft Dynamics GP | Tools | Setup | Sales | Receivables. The following are explanations of the settings on this window:
Aging Periods: Aging for receivables transactions can be done by Due Date or by Document Date
(Transaction Date). All AR inquiry windows and reports will use this
setting when showing aging information for receivables transactions.
Dynamics GP allows for up to seven Aging Periods, or buckets, which cannot overlap and cannot exceed 999 days.
The out-of-the-box-reports in Dynamics GP will
show only four receivables aging buckets. If you want to use more than
four aging buckets, you will need to customize your reports.
Aging settings can be changed at any
time; however, all open records will need to be reconciled while users
are out of the system to propagate the changes, so this is not something
companies will want to do often If different payment terms are offered to different customers, aging by Due Date is recommended.
Track Discounts Available in GL: If
you are planning on setting up a Discounts Available account for
tracking available discounts separately in the General Ledger, select
this option. If this is not chosen, discounts can still go to a separate
GL account, but only at the time that payments or credits are applied.
Print Historical Aged Trial Balance:
Even if a custom report is used to print the Historical Aged Trial
Balance, it may be useful to compare it to the out-of-the-box report, so
it is recommended to allow printing the Historical Aged Trial Balance.
Delete Unposted Printed Documents: It
is recommended to leave this option unchecked, so that if a receivables
document (for example, an Invoice or a Credit Memo) was printed and
possibly sent to a customer, users will not be able to delete it. Note
that this setting is for the Receivables module only and will not apply
to any documents printed from the Sales Order Processing module.
Compound Finance Change: Check this option if you will want to calculate finance charges on overdue finance charges.
Pay Commissions After Invoice Paid:
This is a bit of a misleading option, as it makes it sound like Dynamics
GP has the ability to create commissions payables transactions. In
reality, this option only changes behavior of some of the out-of-the-box
commissions reports. Dynamics GP can track commission information and
generate commissions reports, but the functionality is very limited and
many companies either use custom commissions reports or an add-on
product to track commissions if they have anything but a very simple
commissions structure. Leaving this option checked will allow you to
print commissions reports that show commissions only when customer
invoices are fully applied. When using custom commissions reports, this
option will typically not make any difference.
Reprint Statements: If you decide to
use Dynamics GP to print customer statements, all the statement details
will be saved so that they can be reprinted when this option is
selected. We have not run into any situations where the ability to
reprint a statement was something companies wanted to disallow.
Print Tax Details on Documents: This
will print tax summary information on receivables documents. Most
companies do not need this. If selected, you can also choose to Print Dual Currencies, which will show multicurrency detail for taxes.
Auto Apply to Finance Charges First:
If the auto apply feature is used when applying receivables
transactions, this option will cause finance charges to be applied
before any other sales transactions.
Age Unapplied Credit Amounts:
Unapplied credit transactions (Credit Memos, Returns, and Payments) will
always show in the Current aging bucket unless this option is selected.
Most companies choose to age unapplied credit transactions.
Passwords:
Exceed Credit Limit: If a password is
entered here, users will not be able to enter a transaction that
exceeds a customer credit limit without entering the password. If there
is no password, users will see a credit limit warning, but will be able
to ignore it.
Remove Customer Hold: This label is a
bit misleading, making it sound as if this password is needed to take a
customer off hold, which is not the case. If a password is entered here
and a customer is placed on hold, users will need to type in the
password to be able to enter any transaction except a payment for that
customer. If no password is entered, transactions for customers on hold
will show a warning, but users will be able to enter the transaction.
Payments can always be entered, whether or not a customer is on hold.
Exceed Maximum Writeoff Amount: If no
password is entered and a maximum writeoff amount is set for a
customer, the system will not allow a user to enter a writeoff for more
than the maximum. If a password is entered, then the system will prompt
for it when entering the writeoff and allow a writeoff above the
maximum.
Waive Finance Charge: If a password
is entered, users will not be able to waive customer finance charges
without the password. If no password is entered, users can waive finance
charges as long as they have access to the proper window to do this.
|
Note that all the passwords will be stored in plain
text, so if a user should not know the passwords, they should be
restricted access to this window.
|
|
Apply By: This setting determines if transactions are applied in order of Document Number or Due Date
when auto apply is chosen during the process of applying a cash
receipt, credit memo, or return. Auto apply is not very commonly used,
so this setting is not critical and can be changed at any time.
Defaults:
NSF Charge: Enter the non-sufficient
funds charge your company bills customers when a check bounces. This can
be changed at the time of entering the NSF transaction.
Checkbook ID: Optionally, you can
select a default Checkbook ID to be used for receivables transactions.
The Checkbook ID can be overridden on every transaction; this is simply
the default to save users time.
Price Level: Each inventory item in
Dynamics GP can have multiple price levels. Customers can be assigned
one price level. The price level entered here will be used on
transactions for customers with no price level assigned.
Document Format: Choose the default report format for transactions printed in the Receivables module. Typically the Blank Paper option is selected.
Default Summary View: This setting determines what view to show by default on the Customer Summary and the Customer Yearly Summary Inquiry windows. It is recommended to make this either Calendar Year or Fiscal Year to save users time when inquiring on customer information.
E-mailed Statements Status Recipient:
If you will be e-mailing customer statements directly from Dynamics GP
using the built-in functionality, a status report will be send to the
e-mail address specified. If no Status Recipient is specified, Dynamics GP will send the status report to the e-mail address statements are sent from.
The following screenshot is an example of a typical Receivables Management Setup
window with all seven of the aging buckets used. Remember, anything
over four aging buckets will require custom or modified aging reports.
|